
About this lesson
This is the fourth in a series of lessons to incorporate graphical user interfaces (GUIs) into your general-purpose programming. The series follows on from the Visual To Text Coding lesson series.
Year band: 7-8
Curriculum Links AssessmentLearning hook
In pairs, students should visit userinyerface.com (opens external website in a new window) and try the challenge.
User Inyerface is an online ‘game’ where the player must survive working through a frustratingly designed sign-up form. The challenge is to see whether you can get through the whole form.
While working through, the student pair needs to write down as many poor user interface design choices as they can.
Note: Although the game does not use personal details, it is recommended that students enter fake details when filling out the form.
Finally, come together as a class and have student pairs call out each design problem as you proceed through. For each one, discuss what could have been done instead to improve the user experience.
The activity above touches on the third of 4 principles for good User Interface design (distilled from this article (opens external website in a new window) hosted by Adobe): Reduce cognitive load. A GUI should:
- organise elements visually for clarity, chunking or grouping elements where appropriate
- allow recognition through familiar symbols and tooltips
- minimise the number of actions required to complete a task (e g. the 'three click' rule-of-thumb (opens external website in a new window))
 Image credit: www_slon_pics/ Pixabay
Learning map and outcomes
In this lesson, students will:
- access an online programming environment for JavaScript alongside HTML and CSS,
- create an interactive dice roll simulation with dice face images that change when you roll,
- create a dynamic data visualisation to show teaspoons of sugar in various drinks,
- take on a fresh coding challenge to create your own dynamic data visualisation.
Learning input
The videos below introduce the two main applications we'll make in this lesson.
Discuss as a class: How can students ensure that images they are using in their GUIs are not restricted due to copyright?
By understanding Creative Commons (opens external website in a new window) and Public Domain licenses, and learning about the places to find them, students can use images appropriately, giving attribution when necessary.
Learning construction
Step 1: Setup
In this course, different environments will be selected based on their suitability for each demonstrated project.
For more on the set-up and environments used, see Lesson 1.
Step 2: Constructing the dice roll simulator
This video builds the digital clock application from the ground up.
Try it yourself before checking the solution code.
- You'll need these six images for the die sides:
Solution Code
The short video below demonstrates how the same application can optionally be developed offline on your own computer desktop.
Remember, you'll need a plain text editor to edit the code files (.html, .css and .js). Do not attempt to use a standard Word Processor like Microsoft Word or Google Docs.


Step 3: Tinkering with the dice roll simulator
By editing the HTML, CSS and JavaScript, upgrade the dice roll application as follows:
- Instead of two 6-sided dice, the program now rolls two 12-sided dice.
- You'll need these additional twelve images for the new die's sides:
- BigDie01.png (opens in a new window)
- BigDie02.png (opens in a new window)
- BigDie03.png (opens in a new window)
- BigDie04.png (opens in a new window)
- BigDie05.png (opens in a new window)
- BigDie06.png (opens in a new window)
- BigDie07.png (opens in a new window)
- BigDie08.png (opens in a new window)
- BigDie09.png (opens in a new window)
- BigDie10.png (opens in a new window)
- BigDie11.png (opens in a new window)
- BigDie12.png (opens in a new window)
(Images screen-captured from teal 3D dice roller website.)
Solution Code
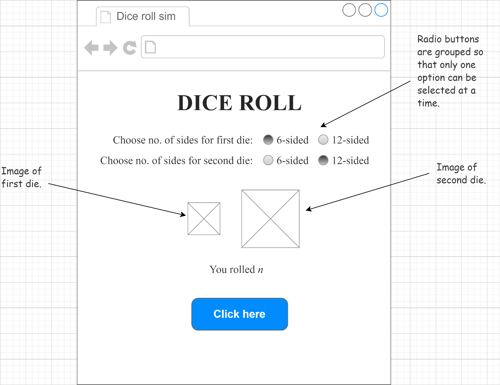
Extra extension task: The user now has a choice whether to roll 6-sided dice or 12-sided dice.
Solution Code
Step 4: Second program – how much sugar?
The video below demonstrates how to create a dynamic data visualisation showing how much sugar is in various drinks.
Try it yourself before checking the solution code.
Step 5: Tinkering with the visualisation
Make the following adjustments to the solution
- Research one more drink of your choice. You'll need an image of the drink as well as the number of teaspoons of sugar in it.
- By editing the HTML, CSS and JavaScript, add the new drink to the solution so that it behaves like the others.
- Also add a link to your source below the first source in the footer.
Solution Code
Challenge
These challenges use the skills covered so far. By writing or modifying their own programs, students have an opportunity to demonstrate Application and Creation.
Challenge 1
This challenge is to create a new dynamic data visualisation, using a small amount of data sourced from an online repository or a class survey.
- Start by deciding what data you will try to display. A simple set of 10 or fewer values is enough.
- Prepare an annotated mock-up to show how the solution will looks and work. When the user clicks or mouses over a category, your solution might:
- repeat an image to represent a whole number, similar to the 'How much sugar?' approach,
- scale a single image to represent different relative amounts (see the sample solution below),
- perform some other visualisation of data.
- Find or create the image(s) you'll need for your solution.
- Use HTML, CSS and JavaScript to create the data visualisation. You might begin by forking the 'How much sugar?' solution in this lesson.
Solution Code
Challenge 2
This second challenge is more open-ended. Now that you know how to switch images, see if you can create a simple game that employs buttons to take actions and a single image to represent a location or status.
For example:
- An adventure game with buttons to move North, South, East and West. A text area explains what is happening in the story, and an image gives an illustration.
- A combat game with buttons to attack, defend or use magic/items. The enemy is shown as an image that changes as the enemy is wounded or defeated.
Games like the above will involve significantly more JavaScript code than previous challenges in this course. Consider organising your code with functions for the buttons and a main function called to update the game once a button has its effect.
Resources
- Online environments for creating webpages with HTML, CSS and JavaScript:
- JSFiddle (opens external website in a new window) – simple interface that hides linking HTML code, also used in Visual To Text Coding lesson series (opens in a new window)
- repl.it (opens external website in a new window) – shows complete HTML to reflect offline approach, and allows uploading of images and other files for use in webpages
- Introductory courses
- HTML tutorial (opens external website in a new window) – An introduction to HTML
- CSS tutorial (opens external website in a new window) – An introduction to CSS
- Visual To Text Coding lesson series (opens in a new window) – The predecessor to this learning sequence introduces JavaScript as well as Python.
- JavaScript CheatSheet (opens external website in a new window) (Tip: Press the little blue tabs to move Variables, Basics, Strings and Data Types to the top.)